大家是否有遇到, 若是在 Windows 7 系統封裝 Sysprep 時, 加入含有 Copy Profile ->True 的 xml 檔案後, 跑 OOBE 階段會發生 error (如下)
"Windows could not parse or process the unattend answer file for pass [specialize]. The setting specified in the answer file cannot be applied. The error was detected while processing settings for component [Microsoft-Windows-Shell-Setup]. "

在製作 OS golden image 時, 我們一定會需要將第一次安裝所 create 的User account 刪掉, 再對系統做封裝 (Sysprep) .
而會發生這樣的狀況就是因為,
我們手動 把 User Account 的資料夾刪除了 (C:\User\xxx Folder),
手動刪除了User Account 及 User Folder , 但是還有此 account 的 registry 的profile information 尚未刪除, 因此在跑OOBE 時, 對系統來說, 會變成是不一致的狀況, 而出現錯誤
HKEY_LOCAL_MACHINE\SOFTWARE\Microsoft\Windows NT\CurrentVersion\ProfileList
因此可以透過以下幾種方式來避免.
下面會教2種刪除帳號的正確方式可以直接避免, 以及已經發生此問題後的workaround, 請自行選擇一種
刪除帳號前, 請先登入 Audit Mode, 再來做 刪除帳號 及 系統封裝
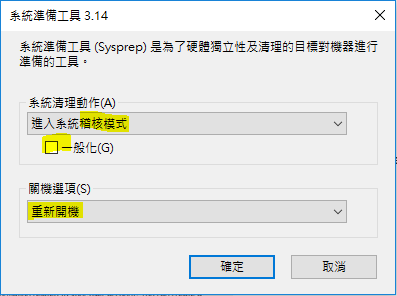
進入Audit Mode (使用C:\Windows\System32\Sysprep\sysprep.exe , 選擇 Audit Mode, 不要勾generalize, reboot -> OK)
正確帳號刪除 方法一.
1. In Control Panel, click System to open the System Properties item
2. Click Advanced system settings to open the System Properties screen.
3. On the Advanced tab, under User Profiles, click Settings
4. In the User Profiles screen, select the user profile that you want to delete, and then click Delete. Click Yes to confirm the deletion
(我的截圖是在User account, 所以delete 那邊會是反灰的, 只要登入Audit mode, 則可以順利delete)

正確帳號刪除 方法二.
1. 使用下列 WMI command 來 delete User Profile. (User 帳號請選自己當時create 的唷!)
wmic /node:"localhost" path win32_UserProfile where LocalPath="c:\\users\\user1" Delete
Workaround
當你把系統做完封裝 (Sysprep), 並且capture 好 OS.WIM 檔案後, 則可以使用以下方式修復
1. 透過DISM command 將 WIM image Mount 起來:
DISM /Mount-Wim /WimFile:<path to the wim file> /index:<index number> /MountDir:<Path to an empty Mount Directory>
2. 開啟 registry Editor.
click Start, type regedit in the Start Search box, and then click regedit.exe or Registry Editor in the results
3. 選擇 HKEY_LOCAL_MACHINE key, and then click Load Hive on File menu
4. 在Load Hive 視窗,
locate the mount directory in which the WIM file is mounted, open the %WINDIR%\System32\Config folder, and click SOFTWARE. When you are prompted for a key name, type test.
5. 在registry Editor視窗
locate the following subkey :
6. Delete the key that corresponds to the user profile that is based on the path in the ProfileImagePath value.
Note. The key name is the SID that is associated with the user profile and user account. The value points to \Users\<user name>, as shown in the screenshot in the "Cause" section.

 留言列表
留言列表
